Showing posts with label easy. Show all posts

Saturday, July 27, 2013

Rustic Apple Blueberry Pie


Pie, did someone say pie?  Pie is my favorite dessert.  I could eat it every day.  Unfortunately, my waistline won't go along with that plan.

Many people fear making pie crust, it really isn't hard, and this pie doesn't require precision or crimping the edges. Shoot, you don't even need a pie plate to make this lovely rustic pie.

I did make my crust the "old fashioned" way, using lard.  You can't beat it for a perfect crust.  

I used fruit that I had on hand, blueberries and apples which yielded a pretty tasty combination.


Sunday, May 19, 2013

No Crust Apple Pie


How about a dessert that you can easily whip up with ingredients you have on hand?
You know, for those times when you need something in a hurry for a drop in guest or when you are just in the mood for something sweet.  Sound good?  Yes?  You will find this recipe quick and easy.  I acquired it from a cooking class during last year's trip to Italy.

Recently, a good friend and I have had some fun debating whether this recipe is a pie or a cake.  You see, the name in the recipe is pie and it is made in a pie plate, implying that it is a pie.  However, it doesn't have a crust, which for me is essential for pie and the texture is more cake like, so I say it is a cake.

The result of our  cake vs. pie debate?  We  agreed on one key point....  It is Delicious!!
I'll leave it to you to decide for yourself!

Saturday, February 2, 2013

Avocado Chocolate Pudding

Unconventional?  Yes!
Easy?  Yes!
Tasty?  Yes!
Good for you?  Yes

I will admit that I don't keep avocado as a staple in my kitchen.  Don't get me wrong, I love a good guacamole as much as the next gal, but it isn't something that I eat often.  As for slicing one up on a salad or adding a few slices to a sandwich, I've never done it.

I found this recipe pinned on Pinterest while looking for low carb treats.  It is all over the place with various variations so I'm not clear who deserves the credit for this decadent creation but my hat is off to them!
I have to admit that I was intrigued and skeptical on how you could successfully make a tasty chocolate pudding from avocados.  So my next trip to the grocery, I bought 3.  Yep, I was hopeful!

Did I like it you ask?  Absolutely!  It provides me with a sweet treat during the week that I don't feel guilty about eating since avocados are nutrient dense.  A single avocado will make 2 servings so do keep portions in mind when you make this.  I've found that a single serving is plenty as it is a rich and creamy indulgence at the end of the day.

...now avocados are a staple at my house!


Sunday, January 6, 2013

Lemony Gooey Butter Cake


Lemon.....ah, my favorite flavor.  I love anything lemon and I've read about gooey butter cakes and I don't recall if I've ever had one.

I got a new stove yesterday and I needed desperately to try the oven.  Well, okay, so maybe not desperately, but I did want to try it out.

I decided that a lusciously lemony gooey butter cake would be just the ticket.  I found this recipe of Paula Deen's and decided since she's know for good southern cooking and desserts laden with butter, it has to be good, right?  I can tell you from the sample that I tasted during the photo session that it is awesome!    Continue on for the recipe.

Sunday, October 28, 2012

Crock-pot Cube Steak

This past week we had 80 degree temperatures followed up with a hard freeze!  When I went to work one day it was summer and when I left work it was winter.  I think I have whiplash!

With the return of cool (okay cold) weather, my thoughts of food head straight to warming comfort foods, you know things that warm you from the inside out.

Lately, my kitchen time has been limited due to a cabinet refinishing project (you've might have noticed I've missed a few weeks..sorry, I am feeling guilty), I needed to get a little more creative with meal preparation.   To help me, I turned to my crock-pot.  This is one helpful appliance and I should rely on mine more than I do.

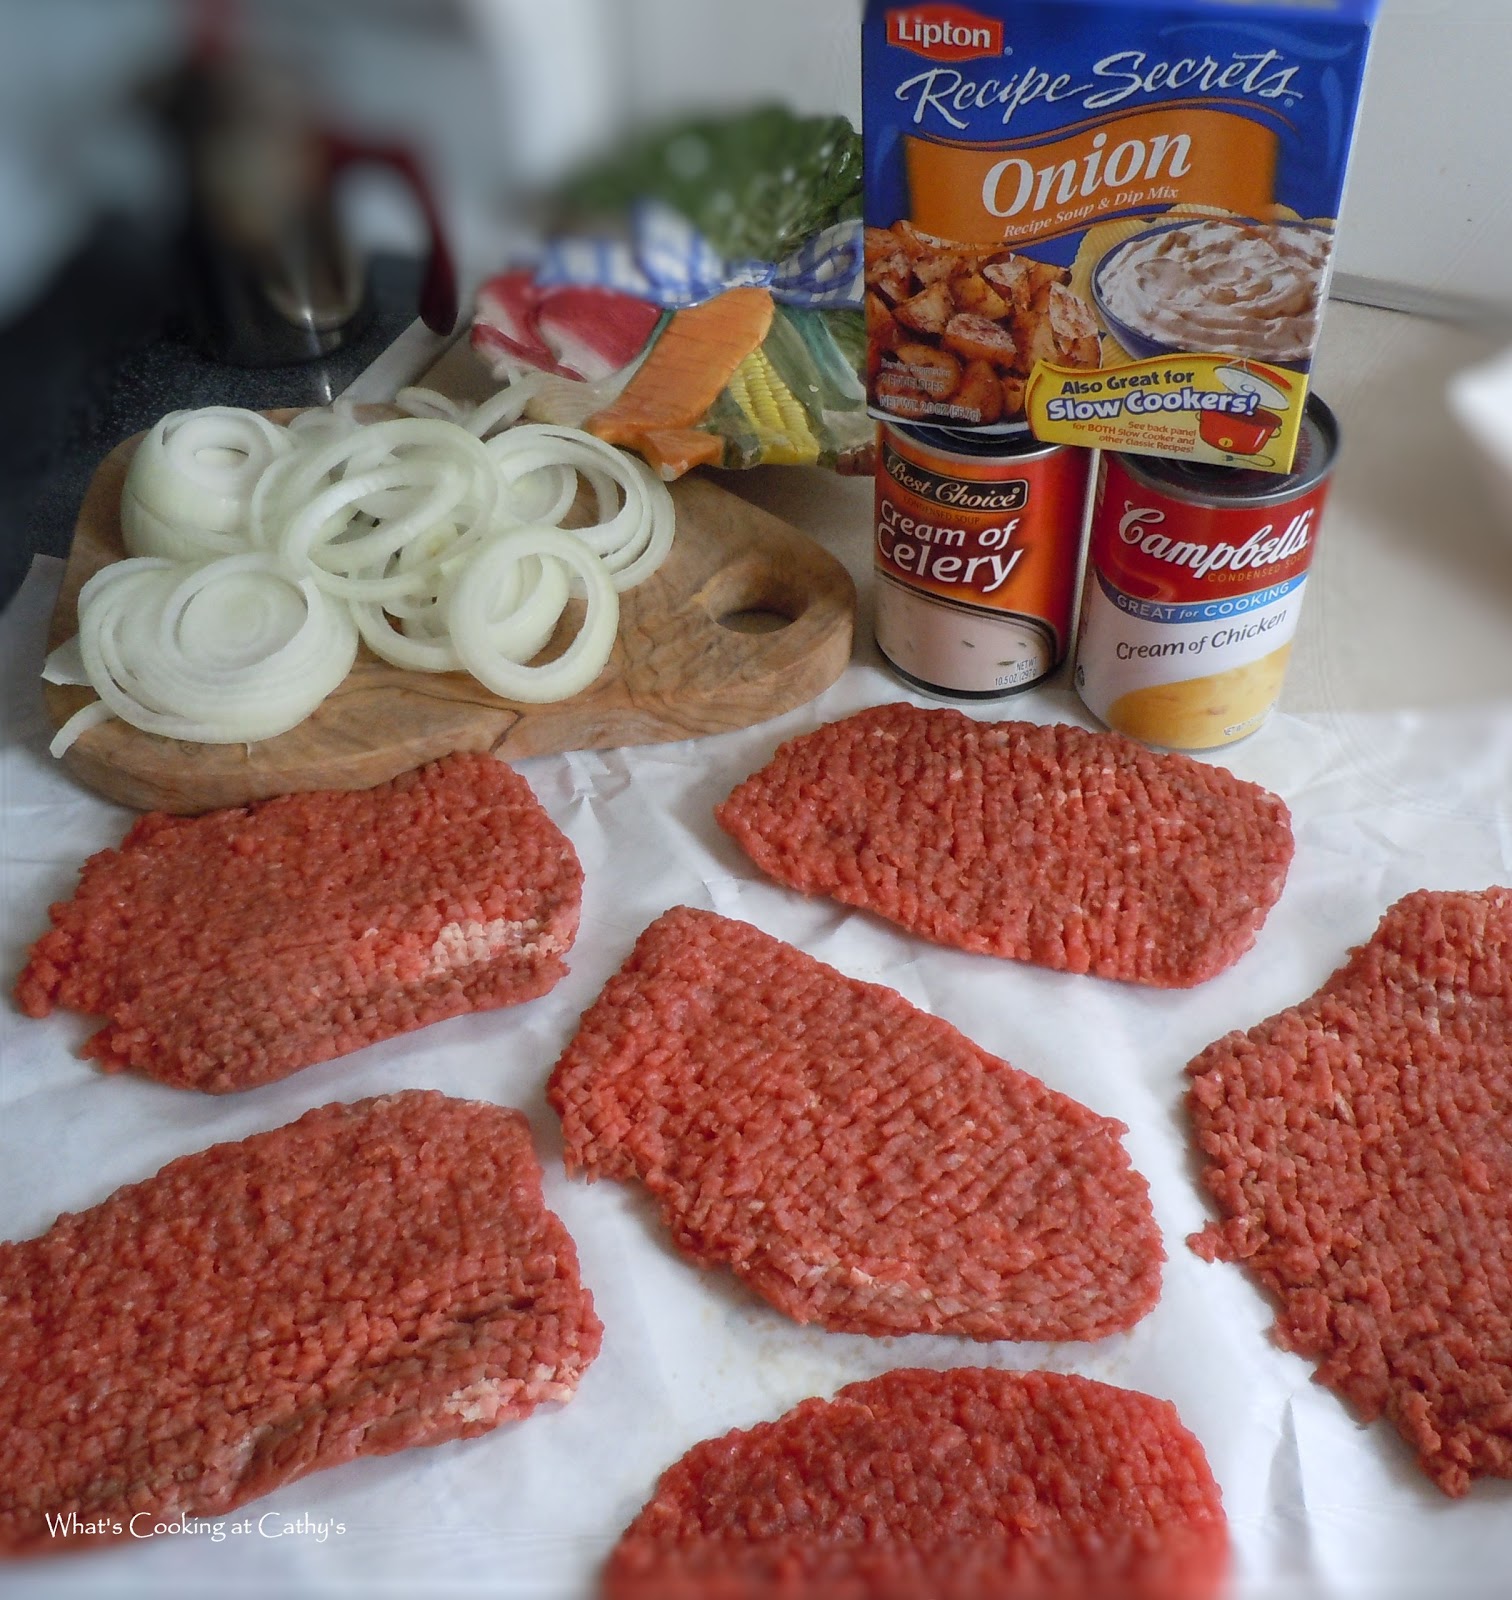
This weekend, I purchased cube steaks at the grocery to make this quick and easy recipe (never mind that I had to explain to the fellow behind the meat counter that cube steak was not hamburger steak).

The end result doesn't look stellar on the plate, but you'll quickly forget about the lack of beauty attributes and photogenic qualities once you dig into a gravy slathered bite.  Of course you have to have mashed potatoes to accompany it to take advantage of the wonderful gravy!  Seconds please!

Saturday, March 17, 2012

Irish Soda Bread

Today is St. Patrick's Day and parades and celebrations are plentiful and everything is green!

I'm not so much into the celebration and party atmosphere that the holiday brings....rather, I'm here in my kitchen, having my own kind of fun with flour, butter, milk and a few other ingredients.  The holiday has inspired me to try something new, something I've not made before....Irish Soda Bread.  It is surprisingly simple and uber easy if you have a Kitchen Aid stand mixer to lend a hand.

I haven't planned a "traditional" Irish meal.  You see, I'm not a big fan of corned beef and cabbage and boiled potatoes.  It's not the veggies I have issues with, I'm just not a big fan of corned beef.  Instead I am slow cooking a brisket with my homemade dry rib rub and grilling some cabbage slices and will accompany those with this recipe for Irish Soda Bread (slathered with butter).

I found this recipe on allrecipes.com.   The recipe has a high rating and a sea of positive comments.  Based on the comments of the masses, I altered the baking instructions just slightly.  I lowered the oven temperature and increased the baking time.  I also opted to bake my bread as 2 loaves rather than one large loaf and I'm baking it in baking pans that are stoneware (think pizza stone) in hopes of a nice crusty bottom on the loaves.

Don't worry about the 1/4 cup melted butter and 1/4 cup buttermilk that you baste the bread with.  It sounds like a lot, but I used every drop.  The bread is out of the oven now and it smells heavenly and it sure looks is tasty!

Irish Soda Bread
adapted from allrecipes.com

Ingredients:

4 cups all-purpose flour
4 Tablespoons white sugar
1 teaspoon baking soda
1 Tablespoon baking powder
1/2 teaspoon salt
1/2 cup butter, softened
1 cup buttermilk
1 egg
1/4 butter, melted
1/4 cup buttermilk

Directions:

Preheat the oven to 350 degrees F. 
If you are using a pizza stone or stoneware baking dishes, preheat the baking dishes along with the oven.

In a large mixing bowl, mix together the four, sugar, baking soda, baking powder, salt and 1/2 cup butter.  It should look like this when it is "right".


Stir in the egg and buttermilk.


Turn the dough out onto a floured board and knead a few turns to pull it together.  Don't work it too much.  This is a different type of dough than regular bread dough and it won't benefit from excessive kneading.  


Form the dough into two 6 inch rounds and place them in the baking dishes (or on a cookie sheet, etc.). 


Pat the dough down slightly and using a sharp knife make a "X" in the top of the loaves. 
(I think I cut mine too deep, I'll go a little easier next time I make the bread.)

In a small bowl, combine the melted butter and buttermilk.
Brush the tops of the loaves with this mixture and put them into the preheated oven.
Bake 50-60 minutes, checking for doneness.  When done a toothpick inserted into the center of the loaf will come out clean.  Brush the loaf with the butter mixture while it continues to bake.  I did 4 brushings every 10-15 minutes.

When the loaves come out of the oven, wrap them in a clean dish towel and set the loaves on racks to cool.  Yes, it is okay to slice off a chunk!  Everyone knows the best bread is warm from the oven!  

I am really satisfied with this recipe.  I think it also has great possibilities for added ingredients such as rosemary, raisins, apricots, etc. 

Tie on your apron, and bake up a couple of loaves and share one with a friend!

I'll close today's post with an Irish Blessing.

May joy and peace surround you,
    Contentment latch your door, 
        And happiness be with you now,
            And bless you evermore."


...and that's What's Cooking at Cathy's ~ Enjoy!

Saturday, March 10, 2012

Gluten Free and Sugar Free Peanut Butter Cookies


If you are a lover of peanut butter and especially peanut butter cookies, you most certainly will like this recipe.  It is simple and you only need a handful of items to make them with an added bonus of being low sugar and gluten free!


I found this recipe via Pinterest which led me to a blog which linked  to Food.com.  I'm a big Pinterest fan and have pinned oodles of things that I want to try "someday".  


Anyway, as most of you know, I've been trying to eat healthier.   One of the things I have done is reduce the amount of "white" flour in my diet as well reduced the amount of refined sugar I consume.  Since this recipe was gluten free, I figured I would make a few modifications to reduce the sugar and give it a whirl.  


The result was a decadent, soft peanut butter cookie with a touch (okay, a slathering) of chocolate on the base....go with me for a minute and think Peanut Butter Milano's.  Yeah!  Great Results and to top it off, two cookies weigh in at just 115 calories!  So I can have two cookies with my coffee and not just one, which is much more satisfying!


If you aren't counting calories and don't mind eating the sugar, you can substitute 1 cup of granulated sugar or split the cup into equal portions of both granulated and brown sugar for a richer colored cookie.  Either way you decide to make them, the result will be addicting little cookies... and I'll bet you can't eat just one!  


Gluten Free & Sugar Free Peanut Butter Cookies
Yield: 36 cookies 


Ingredients:
1 cup natural peanut butter
1/4 cup Whey Low Granular
1/2 cup Whey Low Gold
1 large egg, beaten
1 teaspoon baking soda


Optional Glaze:
1/4 cup heavy cream
1/2 cup chocolate chips


  • Directions:
  • Preheat the oven to 350 degrees F.
    Line two cookie sheets with parchment paper or grease the cookie sheets.  (I prefer parchment paper for easier cleanup!)
    In a medium mixing bowl, beat together the peanut butter and sugar with an electric mixer until smooth and creamy.
    Add the beaten egg and soda to the peanut butter mixture and beat until well blended.
    Using 1 teaspoon (measuring teaspoon) roll the dough into small balls and place them one inch apart on the cookie sheet.
    Flatten the dough balls with the tines of a fork.  Dip the tines in the sugar to prevent them from sticking and ruining your lovely crisscross patterns.


    Bake the cookies for about 10 minutes, until golden brown.
    Cool the cookies on the baking sheet for 5 minutes and then transfer them to a rack to cool.

    At this point, you can decide if you want to add the glaze on the bottom of the cookies.
    Flip the cookies so their bottoms are up.
    In a saucepan, heat the cream until it reaches a boil.
    Remove the cream from the heat and pour it over the chocolate chips.  Let the mixture sit for 10 minutes then stir and stir and stir.  It will look awful initially, but it will come together and create a lovely chocolate glaze.

    Using a pastry brush (yes this is messy), paint the bottom of each cookie with a generous amount of chocolate. 

    Let these cool and store between sheets of waxed paper.  The chocolate will keep the cookies nice and soft. If you are looking for a crisper cookie, omit the chocolate glaze.  You can also make sandwich cookies out of these by sticking two cookies together with the chocolate glaze. Either way is yummy!


  • Store the cookies in an airtight container at room temperature for around 5 days....of course, that's assuming they last that long!


  • ....and that's What's Cooking at Cathy's ~ Enjoy!